5 Woodworking Tool Chest Project Plans With Drawers
Wooden Tool Storage Box Building Instructions
If you're interested in adopting a healthier lifestyle, think about the possibility of building a mini-garden (https://woodworkingdrafts.com/) at your home, based on the fact that the building doesn't require a substantial investment or a large amount of knowledge in the fields. If you're planning to install the wall hanging, which has keyholes on the back, you should create an outline of the wall to assist you in placing the screws. Apply glue to scrap boards, and within only a few minutes, you'll be able to get it down. Cut long sides of the box into lengths, and then employ a square, paint container, and washer to draw the shelf support. Flip the cart upside-down, and then install the three braces on the bottom.
Install various kinds of holders to accommodate smaller sets and tools. Dovetails are cut by hand, which requires many years of experience. However, machines help make it much easier. Each frame has two stiles as well as two rails. After clamping legs to the seats, sides, and back, flip the chair around and clamp the other two legs. Place the bed frame flat on top of the pad, with the bed's head facing the frame facing the wall. Then drill and ensure that your spacers are flush to the cabinet's fronts. This allows you to make your own trims for the perfect style. Utilize an easy, arcing motion of your arm to make a gradual curve.
Keep the saw carriage in this position, then let the switch go and let the saw carriage slow down completely prior to raising it. The trim pieces are constructed from 1x6s that have been cut in half. If you don't have an electric miter saw, you can use a wood or plastic miter box that can guide the handsaw. Inject pencils into holes on the edges of shelves or insert small eye screws into the erasers and hang them on nails. Connect the back and bottom pieces, and then make pilot holes for wood screws. A magnet inside a medicine cabinet can aid in storage as well as storage. Read more about the reasons to keep a magnetic device in a medicine cabinet.
This fundamental woodworking skill will aid you in a variety of woodworking tasks. Then, turn on the grill and then sit down to the first meal you'll have at the table you've just purchased. Our cookbook platform can be tucked beneath one cabinet. Attach each one of them to two hip rafters. Based on the type of wood, you could pay similar to what we paid for birch and maple, or you could spend more than twice. For larger projects, it is possible to use a mixer for rent, but it's probably cheaper to order ready-mix concrete.
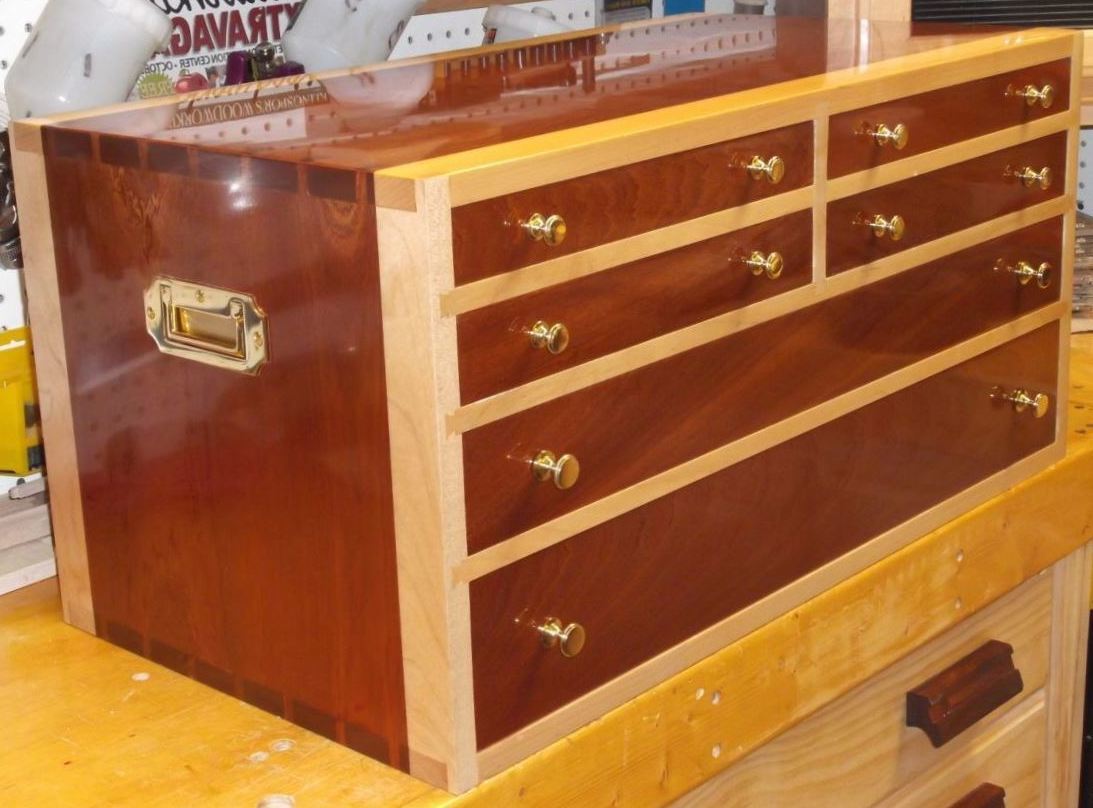
If you've ever attempted to make a right and level hole into the end of a plank, you'll know it's virtually impossible using the use of a hand drill.The next step is to create spaces that fit behind stiles and side rails. Plan on spending between 10 and 12 hours over an entire week to complete your project. Last but not least, lay out and drill pilot holes for the drawer pulls. Then place the nailheads. Apply a finishing to the cabinets' color, then place the center screw and the lazy Susan bearings under the big disc. Then, play with the spin bottle. Install baseboard molding, and you're all set to set up your new and stunning display wall. For a similar look, you can purchase pavers prior to the time frame and place the full-size design in your front yard. If you've put continuous backing between the studs or are mounting the track to an underlying board, you might have the track that has been predrilled, and you can connect it to the wall.
This fence is a marvel of ease and effectiveness. You can then ask someone to help you lift each box on the ledger board. This will hold it in place until you can attach it to the wall. It is important to ensure that the new track doesn't strike the furniture frames as the door opens. When you have one side out, other sides will fall back. Secure the structure with screw and cedar boards. Keep an eye out for the grit and how much glue you must remove. Tape is wrapped around drill bits to indicate the depth and make sure not to scratch it.
Procesando video...
The board can be clamped or tacked to sawhorses and slide through the saw and jig length of the board. The spaces between the boxes can form compartments, too. Install the post in the hole, and adjust the height. Fill and fill in the soil around the post's bottom. Make pocket holes on both sides of the support set between the backrests. This woodworking project focused on wine glass rack designs. I've made a few of these shelves, and at times joints do not work perfectly. You can find a different storage solution here. Before attaching horizontal pieces of wood to the legs, choose the most attractive sides of the boards and ensure it's facing the side of the bench. For anchors to be installed, read the instructions and then drill the correct size hole.
Most often, the most challenging and time-consuming component of a project such as this is the construction and installation of doors for cabinets. In contrast to a rag, which is difficult to clean the glue off the pad, the pad is made of a loose weave of synthetic, which allows glue to release quickly. Cedar is our preferred material that we prefer because it is resistant to decay. Repeat the process for another leg-apron. A drill press can help, but not essential. This wide end allows you to screed away excess sand much easier and also allows you to place the border precisely. Follow the directions included with your jig to find ideas for other kinds of joints. Build the U-shape as well as box-shape backers, and then nail the pieces to each other.
On a level, flat surface, secure legs to seat and rear. Then, fill the corners with joint compounds. Cut sharp edges of the timber with tiny round-over bits. After the assembly, you won't be capable of getting adequate penetration in the crevices and cracks. Begin by using a lag screw at one side of the cleat. Verify the level, then screw the other end down before making the middle screws. Set up the boards, alternating lighter and darker wood. Make sure you leave enough (https://www.thisoldhouse.com/furniture/21016989/how-to-build-a-storage-chest) lengths and depths shorter on the short sides. When you next sand a project, put down a small piece of carpet. This will protect the wood. Keep it in place while you sand. It will also help to reduce the vibrations of the sander onto your fingers. Make sure the planter is protected from cutting by sanding or planning an extensive bevel along the bottom edge of every panel.
If you're looking for rustic appeal and would like to cut costs, make sure you take note of these plans for timber bars. You'll now have dirt and a potting area in your reach when you wheelbarrow into the garden. With a Forstner bit, make holes to install desktop screws on the high-end edges of tables' sides. Follow these step-by-step directions to build your own and enjoy the shopping experience with your daughter or son. Scratches and spots on the surface could attract a stain. Use these ten summer safety guidelines to remain cool and safe in the sunshine. Attach drawer slides to the bottom of the drawers and also to the cabinet. Attach the router to the trammel with the screws for the base plate. Label the parts and add them to make sure that you can have sufficient of every type.
Also, getting rid of any extra stuff can be helpful too. To ensure that you don't have to wait for concrete to set the posts, fill your posts using dry cement mix instead of pouring concrete that is wet. After the shelves are put on the wall, you can make sure to square the locker by taking measurements diagonally from corner to corner, starting from one end and then from the other side, then moving corners either way until you have the measurements equal.Cling wrap is a great way to create an airtight seal for paint and finish containers. In addition to the low-maintenance aspect of the exterior trim, we picked the material Miratec for corners, doors, or window trim.
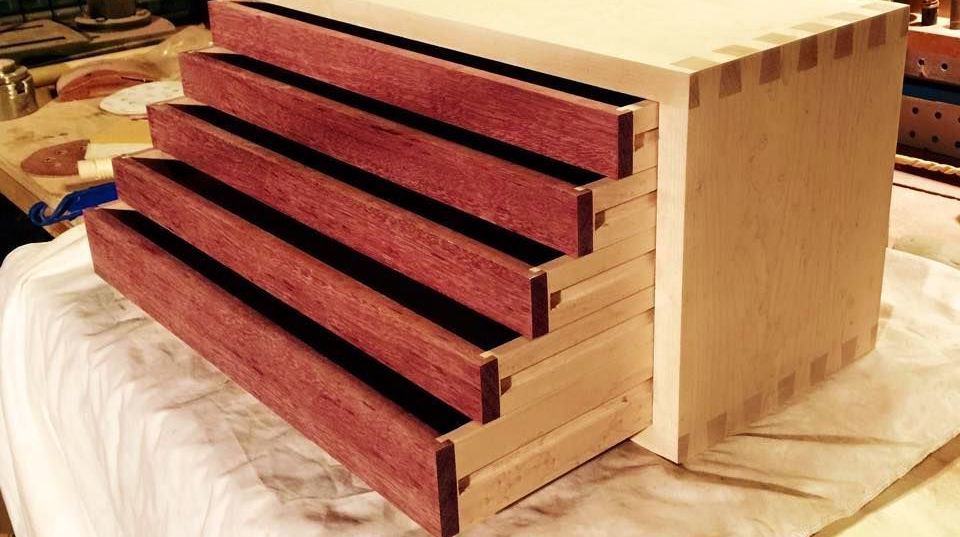
Be sure to trim the edges and ends of the boards. The cuts made in the lumber mills are typically rough, so make sure you trim the ends of all boards prior to taking measurements. The shelves' layers are joined with steel pins. We've designed this project to be functional regardless of whether your space is slightly out of alignment. Even though his idea was improved in the past century, it's still a brilliant idea.Change the size of the part according to your preferences. It will require a compressor to provide power to the device. Make use of a stop block in order to cut the pieces swiftly and precisely. Cedar is a softwood, and it is not likely to split when screwed on or nailing. We also recommend investing in top-quality products, particularly if you plan to put a table in your yard. Dig postholes and then set the arbors into them.
Then, raise the blade a bit and repeat the procedure until the tenon fits comfortably. Once you've found the ideal place, mark one of the corners using masking tape. It's this angle you'll need to align your saw at. Then flip it upside down to draw the second half. Repeat this process to draw the blank leg. Thus, you can increase the size of the wine rack and hold more bottles. You can alter the size depending on your preferences or remove the drawer or even add an extra tray that lifts out from the top.